Computer Programs feature the “track changes” function, enabling users to observe the customization of a shareable file. Users can effortlessly utilize the track changes function to view edits and comments from prior backups. Google Docs employs a specific procedure for tracking alterations. Furthermore, Google Docs’ edits improve work efficiency with clients, ensuring enhanced productivity.
This article resonates with how “track changes” in Google Docs functions and how you can use it to enhance performance.
What Is Track Changes in Google Docs?
One might wonder what Google Docs Track Changes is – Google Docs is an e-based word processor. It enables multiple users to read, edit, or review a document synchronously. Sometimes, this convenience makes editing challenging. The track changes tool offsets this glitch. It is integrated into Google Docs and presents a series of edits. You can view the modifications, alongside the persons who applied them. Track changes offer two routes:
- Directly edits the document
- Use Suggestion mode to suggest modifications, including:
- View your client’s and any other person’s edits on the same page
- Allow off-set suggestions
- Revert to the previous document if necessary
What are the Benefits of Track Changes in Google Docs?
The capabilities of Track Changes make it a valuable resource for editors.
Here are the perks of using Track Changes in Google Docs:
- Saves time – boosts efficiency
- Streamlines and simplifies the reviewing process
- Boosts accountability for tracked modifications
- Offers unconditional support for using the document as a unified platform for communication instead of sending separate emails
- Allows complete control over the final version
- Optimizes communication by offering real discussions within the document itself
- Maintaining a clear history of edits
- Quickly identifies who made specific modifications
How to Track Changes in Google Docs?
Here is how you can use Google Docs track changes, along with the step-by-step guide:
1. Open the Document You Want to Use
Access the Google Docs Homepage
- Choose the document
- Type the title of the preferred document in the search bar located at the top
- Alternatively, click on the + symbol in the top left interface to create a new file
2. Enable Suggesting Mode
Suggesting mode empowers you to suggest relevant adjustments to a document instead of making direct edits. Making trackable changes is one of the major compatibilities of Google Docs.
Here is how you can turn on the Suggesting mode:
- From the top-right of the document, tap on the drop-down menu to select the Suggesting mode
- Alternatively, highlight the text for the suggestion
- Select the green pencil icon
- In case your suggestion is accepted by the respective person/client
- The change will be applied to the document
How do you track edits in Google Docs suggesting mode?
- Launch the document for which you want to make changes
- From the top right corner of the document page, click the “Editing” button (pencil icon)
- When clicked, a drop-down menu will reveal three editing options: “Editing, Suggesting, Viewing”
- Select “Suggesting”
- This will assist you in editing the document without replacing the original text, helping you make traceable changes
- At this point, you can add comments to your suggestions by selecting the text
- Click on the “+ Comment” button
- Before sharing the suggestion with the panel, select “Commenter” on the “General Access” roles
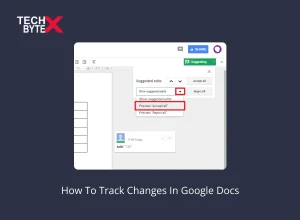
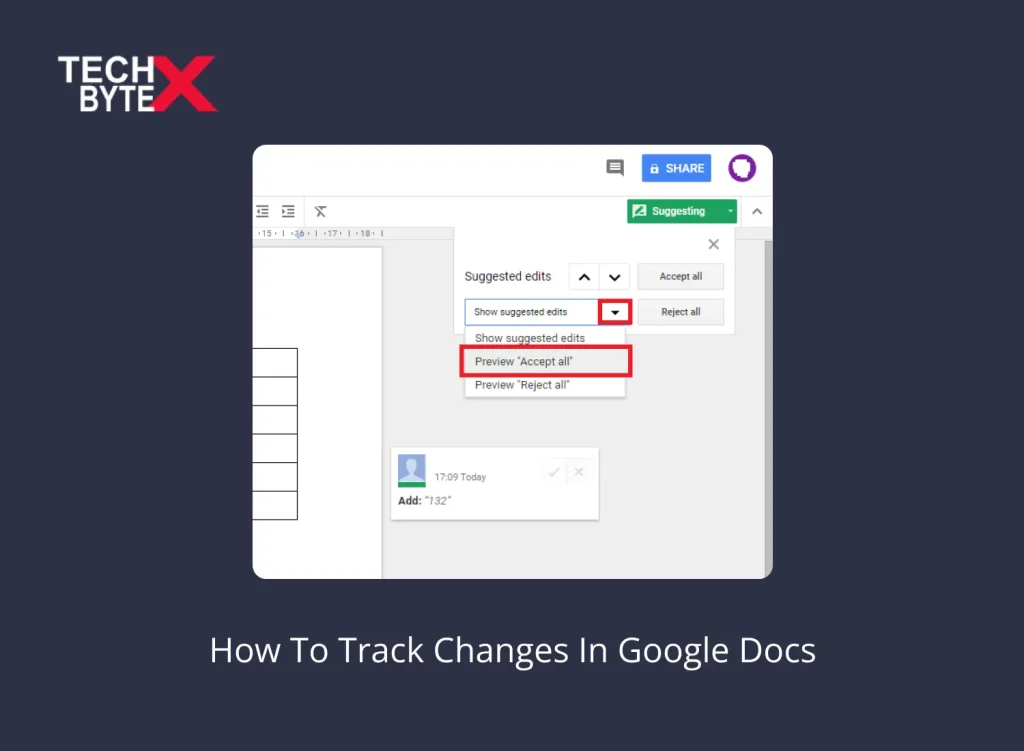
How do you Accept or Reject Suggestions in Google Docs?
When the notification regarding the suggestion to make edits is received by the owner of the document, he has the power either to accept or reject it. The owner can also reply to the comments. Furthermore, the owner can take the following actions:
- Launch the document and apply the changes
- Review the suggestions by clicking on the suggestion
- Can keep or discard the change by selecting either “Accept” or “Reject”
- Click the check icon if want to “Accept”
- Click the X icon if rejecting a suggestion
- Click on the comment icon to reply to the suggestion by clicking “Reply.”
3. Share the Document
You need to share the document to coordinate with your client or project team. The seamless sharing of the document is crucial to infer your edits.
Here is how you can do it:
- In the top-right interface, select the blue colored “Share” button
- Type and navigate the name of the respective person to whom the content is supposed to be shared
- Alternatively, under General Access, select the person with the link
- Once, selected, from the drop-down list, choose either Viewer, Commenter, or Editor
- This will allow your collaborators to access the document and take the steps according to the permission granted
4. Check and Delete Version History
Thanks to Google Docs’ version history that allows a complete list of edits. It facilitates a situation where you want to share the fraction of the content of a Google Docs file that you have intentionally or unintentionally deleted.
Here are two approaches to deleting a version history in Google Docs:
First Approach: Delete Version History Using a New Document
- Head over to Google Docs
- Launch your document
- Create a new document by opening another tab
- Coming back to your original document and use short keys to select the entire document
- Copy the selected content using the above keys
- Paste the original content into the new document using the following keys
- From the upper-left corner of the Docs file page, click on “Untitled document”
- Save the document with a new name
- Now, checking the version history of the new document will show only two entries: creation of the document, pasting of the content
- This will allow future tracking to be easy and quick
Second Approach: Create a Copy of Your Document to Hide Edit History
This approach is relatively easier than the previous one.
Here are the instructions for doing it:
- Launch your preferred browser
- Access the original Google Docs file
- Navigate to “File”
- Choose “Make a copy”
- This will open a pop-up box
- Type the name for your file or leave the option, up to your preference
- Now, press “Make a copy”
- This will create a new document
- Launch the new copy to open in your browser
- Now, check the version history of the copy
- It will show only one entry
You can also hide the edit history on your Google Docs. Being an owner of the document, only you can access the entire version history, restricting others from accessing it.
Here is how hiding the edit history procedure goes:
- Open the Google Docs file
- From the top-right interface, choose the “Share” button
- By pressing the “Editor” option next to your collaborators, change their role to “Viewer”
- Click “Restricted Access”
- This will give you an option to change it to the “Anyone with the link” option
- Leave the access status as “Viewer”
- Once done, click on the “Save” to apply changes
- Now, anyone opening the document cannot access the version history
5. Restore an Earlier Version
In case you want to revert to the pre-modification draft status, don’t worry; you can do it using the simple process given below:
- Select the version
- Navigate and click on the blue colored “Restore this version” option from the top
It is substantially important to note that using this option will erase all the changes made in the current versions of the document.
Pro Tips for Tracking Changes in Google Docs
Here are some promising tips to get the best out of track changes in Google Docs:
Tip # 1: Use suggesting mode effectively to coordinate with your clients or team members, ensuring the document’s integrity remains intact
Tip # 2: Personalize the digital layout of the modifications, ensuring quick referencing and optimizing readability
Tip # 3: Highlighting the changes or giving reasons why you made the changes streamlines the workflow
Tip # 4: Use the “Resolve” option to keep or discard the suggestions abruptly, ensuring it saves time and energy
Tip # 5: Every edit supported by a comment enhances clarity, leaving no possibility of uncertainty
Tip # 6: Use interactive communication explaining deadlines, suggestions, changes, expectations, and more
Tip # 7: Give ample time to review a suggested change before accepting or rejecting it
Tip # 8: Be vigilant about writing specifics like spelling, grammar, and punctuation
Tip # 9: Ensure that any change applied to the document aligns with the overall style or tone of the document
Tip #10: Reap the benefits of using the track changes feature by utilizing it in the right manner, and collaborate with your team about the usage properly
Tip # 11: Make sure all collaborators know how to use keyboard shortcuts, as Google Docs support several shortcuts. For instance,
- Quickly track the changes
- Inserting a comment (Ctrl+Alt+M)
- Activating or Disabling the suggesting mode (Ctrl+Shift+E)
Final Takeaways
Hopefully, you have gained useful insights regarding track changes in Google Docs. It is a practical solution to optimize collaborations, offer proofreading convenience, and craft impeccable documents. At TECBYTEX, we present every possible detail about using the powerful tool – Track Changes which is an in-built feature of Google Docs. It allows trackable edits, and efficient collaboration, ensuring a stellar document presentation.