You must have experienced one of the most annoying and bizarre activities while working in Windows 11. It actually happens when your mouse does not obey your intrinsic commands. It keeps scrolling down or up in some specific or all applications, and you do not k.5005.’.210/now how to hold it. If you are going through the same misfortune, then this helping guide would be a happy chance to chuck away the frustration. This content is aimfully written to let you know the reason causing the Windows 11 scrolling on its own glitch, and how you can troubleshoot and mend the blip.
Some common causes of the awkwardness that are related to the mouse functionality on your computer are:
- Outdated Windows
- Enable features like inactive scrolling in the computer setting
The meekest fix comes to an average capacity mind is, disconnecting and reconnecting the mouse from the computer, and it sometimes works too. Below down are some effective methods for the mouse scrolling down in Windows 11 on its own, keep the ball rolling till the last line to fix the window error.
Here are some effective fixes to repair Mouse auto scrolling in Windows 11
When your mouse is automatically scrolling to the bottom or top on the screen without your intention. You want to fix the blip on the earliest basis because it can make you up badly. Plus, simple browsing becomes annoying and makes your computer unusable. The irksome snag can mean a hitch in the hardware or the software of your computer, and in this article, we will assist you in the most practical manner to resolve the issue.
We will discuss every possible aspect that can cause the problem, and every possible option to fix the issue. Let’s start with the tangible mechanisms of your computer to detect the actual sickness.
Check the Hardware
Here are a few functional steps to know the reason for unintentional mouse scrolling which is caused by your hardware. Whether you are using a touchpad laptop or an external mouse, follow the stated steps.
- Unplug and re-plug your mouse and see if the problem is resolved or not
- Make sure your mouse is properly cleaned, and there is not any dirt obstruction in the mouse scroll wheel
- Plug the mouse into a different USB port
- In the case of a wireless mouse, plug the mouse receiver into a different USB port
- Replace the battery of the wireless mouse and check the recovery status
- Make sure the keyboard’s End or the Down-arrow key(s) is not pressed
- You should also keenly check the keys because sometimes a damaged key is the actual culprit that was forcing Windows to scroll down automatically
- A touchpad laptop is more susceptible to becoming more greasy and requires frequent cleaning. It can cause the cursor to behave awkwardly. So, you need to shut down the computer and clean the touchpad properly to avoid the inconvenience
- Check the mouse’s functionality on another computer or another mouse on your computer to trace the bug
- Keep your computer free for a while from other pointing devices. For instance, USB pen tablets or Game Controllers
Troubleshoot the software
Let’s move to some intangible mechanisms of your computer. If the above-mentioned steps have proved futile, then the problem of mouse erratic movements might be because of:
- Incorrect Windows settings
- Recent unstable updates
- Faulty mouse drivers
In this scenario, follow the below-mentioned methods to have a complete hold on your mouse scrolling.
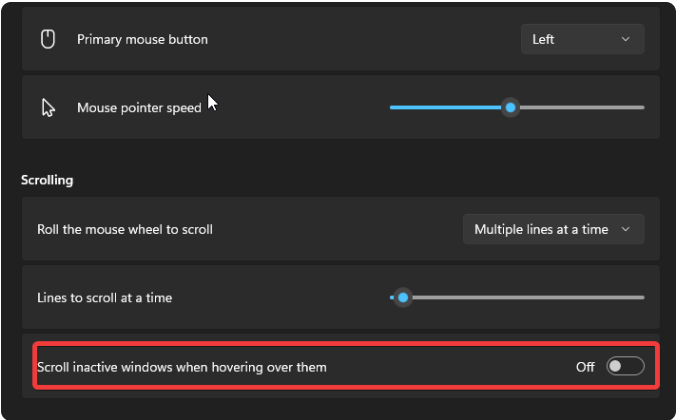
Method 1: Disable the option: ‘Scroll inactive windows when hovering over them’
It is being observed that the mouse’s auto-scrolling error has been resolved by just bringing some changes in the Mouse settings.
- Press the Windows key + I to launch the Settings app
- Head to the right pane
- Select Bluetooth & devices
- Click Mouse
- Move to the scrolling options
- Disable the option, “Scroll inactive windows when hovering over them”
Once the process gets completed, see if the problem is resolved or persists. Normally, the mouse stops behaving awkwardly on its own after going through this method.
However, if you are still facing an irritating glitch, jump to the next method.
Method 2: Uninstall and Reinstall the Mouse/Touchpad driver(s)
The subsequent method to fix the mouse auto scrolling down the problem in Windows 11 is, to draw out all the mouse drivers from your computer, and to re-install them.
Here is the procedure to go through:
- Right-click on the Start menu
- Select Device Manager
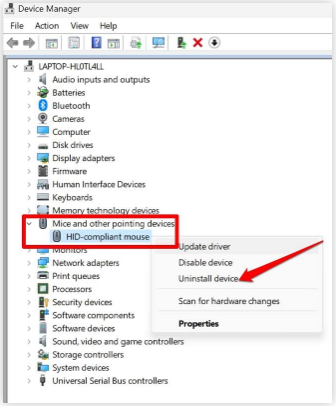
- Expand Mice and other pointing devices
- Right-click at each pointing device (mouse or touchpad)
- Select Uninstall device
- A dialog box will flash on the screen with a caution
- Select Uninstall to approve the removal
- Follow the same practice with all installed mouse or touchpad drivers
- Restart your computer
- The moment your computer is turned on, the suitable driver for the mouse (or/and touchpad) will be re-installed
See if the glitch is fixed or persists. However, if it is still there, check the feasibility of the next method.
Method 3: Scrutinize and Repair Windows System files
It is yet another option to fix the blip. In this method, a command-line tool is used that names “System file checker” to scrutinize and repair corrupted or lost system files in Windows 11. It is a functional method and can fix many software problems.
Here are a few simple and easy steps, you need to follow for painless browsing and effortless working in different applications.
- Open command prompt as administrator
- In the Search box type: cmd or command prompt
- Right-click on the command prompt (result)
- Select Run as Administrator
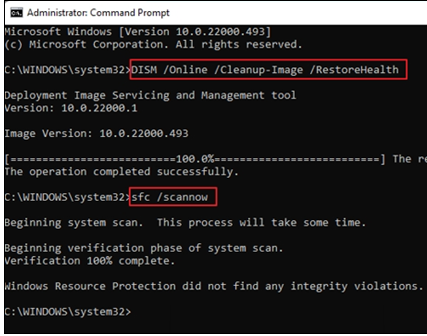
- At the command prompt window, type the following command & press Enter: Dism.exe /Online /Cleanup-Image /Restorehealth
- Wait for a few minutes, until DISM repairs the component store
- When the operation is accomplished, you will be informed that the component store corruption is fixed
- Give the said command and press Enter: SFC /SCANNOW
- When the SFC scan is done, restart your computer and see if the mouse drive becomes fine or if it is still flying to the top or sinking at the bottom. If everything becomes smooth and hassle-free, pat yourself on the back for victory.
However, if the annoyance is still there, proceed to the next option.
Method 4: Perform System Restore
If the situation is neither fixed nor improved, and every single trick also turns out to be failed. You need to restore your computer to the pre-problem stage. What you need to do is:
-
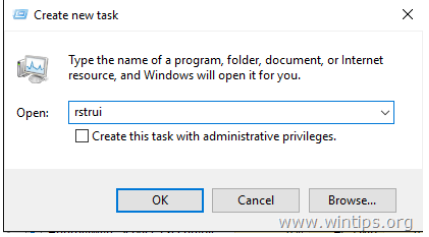
- Press the Windows image + R keys simultaneously
- It will open the ‘Run’ command box
- Type rstrui and press Enter
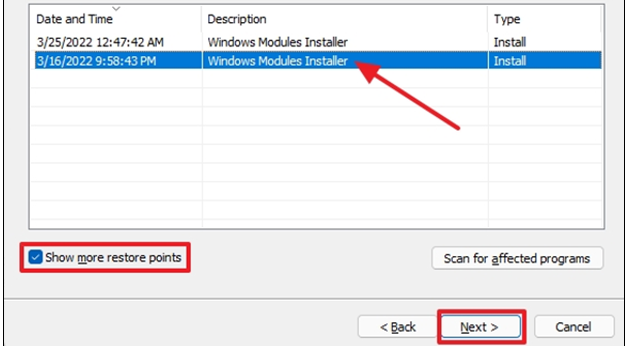
- Click Next on the first screen
- Tick Show more restore points
- Select an ideal date when your computer was perfectly fine
- Click Next
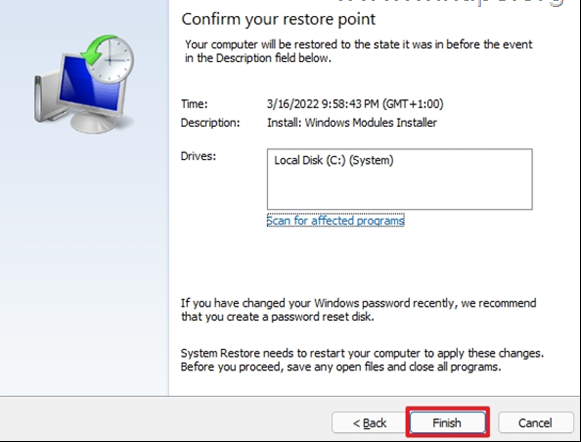
- Click Finish
- It will restore your PC on the date you have selected in the previous step
- Wait with patience because the restoration process can be long depending on two important factors:
-
- The number of files on it
- The speed of your system
-
-
- When the restoration process will be completed the computer will restart back to Windows
Hopefully, this trick will resolve your issue. However, if it did not work, move to the next option.
Reset or reinstall Windows 11
When nothing is working, and you are still in the fiasco of mouse auto-scrolling problem in Windows 11. What you need to do is, reset or reinstall Windows 11. It is pertinent to note, that Windows 11 keeps your personal data and files saved and secured when you are intended to use the option “Reset this PC”. However, it is suggested to create a backup to an external drive to avoid data loss.
Reset or reinstalling Windows 11 is the last resort to correct the mouse auto-scrolling snag, and should be availed after going through all the tricks, tips, and methods.
Final Verdict
So, that’s all!
Expectantly, after going through a variety of solutions you have to get the one that worked for you. In this helping guide, we tried to offer a wide-ranging solution to solve one of the bizarre problems you can experience while browsing on your computer.

